This article's purpose is to show you how to create a nifty muzzle flash/lens flare effect using Paint Shop Pro X. Within reason, any application that handles layers should be able to do this as well, so don't worry if you're limited to just using the GIMP or some other kind of software.
The Objective
The final result should look something like this (bearing in mind that you can make it go as fast or as slow as you want. I hate making GIFs, they never move as fast or slow as I want them to):
Depending on how much time you've got, you can make it as smooth as you want, and with as many rotating spokes as you want. I normally don't make them as smooth as this in-game - I use far less frames. I also find just one rotating spoke is fine.
How to do it
Load up PSPX and create a black canvas to start off with. In our example, we're using a 64x64 canvas.
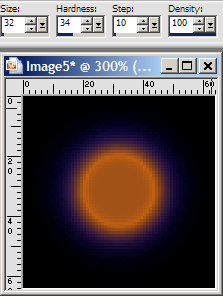
Then we create the basic glow for our lensflare. In this case, I'm going to make a dark blue background using the 'Wet Brush' filter on the Brush Tool. This creates a kind of ring around the brush area, which looks nice. The brush settings are shown below:
Then we'll pop a kind of an orangey bit inside. All the settings are the same, but i've put the size and hardness down.
If we now turn Wet Brush off, and create a yellow blob and a white blob inside it, we'll have our flame effect just about done:
That's a background done. You could have done any kind of background here, I've just chosen a kind of gas flame effect for mine.
It's worth noting that the background should be real black (0,0,0), or it'll look a bit weird in MMF. If it turns out that the edges of the image are higher than black (e.g. 2,5,2) then you may want to adjust contrast, or use the magic wand tool to select colours that are close to black, and get it to feather and antialias the edges of the selection. When that's done, select the edges and fill with absolute black (0,0,0))
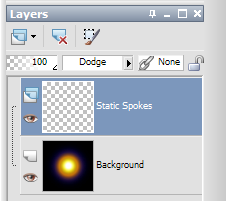
Next, we want to make the SPOKES.
We'll create a new layer, and set the Filter Type to DODGE.
This layer will hold our static spokes - the spokes which won't move.
To create the spokes, we'll use a WHITE brush, on the spoke layer. We'll give the brush these settings (these aren't all the available brush settings, but they're the only ones you need to change from the above):
SIZE: 48 (not quite as big as the whole canvas. The canvas is 64, so i chose 48 here)
HARDNESS: 0 (so it's smooth)
THICKNESS: 1 (this will make the brush very narrow. It'll look tall and thin)
ROTATION: ?? (whatever angle you want the spoke at)
And of course, make sure OPACITY is 100% and Wet Brush is OFF.
If we pop two spokes into the image at any old angle, we'll get this (i recommend that NONE of these static spokes are pointing in a straight line. Save that for the ANIMATED spokes, it makes them easier to animate):
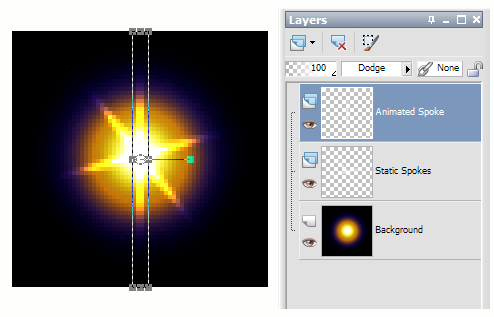
As before, we create ANOTHER LAYER. This layer will be for the animated spoke. If you
want more than one spoke to be animated, I recommend you put each one on its own layer.
We're going to make our animated spoke point in a straight line (so an angle of 0, 90, 180 or 270 degrees). This makes it cleaner when we rotate it.
So far, it should look like this. We've pressed 'D' to get the Layer Deform tool, which shows the brace around the new spoke layer:
We now rotate the spoke a little at a time using the rotation handle (it sticks out from the deform cage).
I won't show this for every frame, or it'd get tedious. But let me run through the steps I would use for just one frame. All you need to do is repeat it for every one you do.
Animating A Frame
TO START OFF:
Open MMF2
Create an Active Object
Clear the default image so you have a blank canvas
STEP 1
Switch to PSPX
Rotate the deform cage using the rotation arm (don't type a rotational value in the box, it won't work).
STEP 2
WITHOUT changing tools (keep the deform cage on-screen),
press CTRL+SHIFT+C to copy the whole image (with all layers merged)
(we keep the deform cage on-screen because it remembers how much we've already rotated the layer by).
STEP 3
Switch to MMF2, add a new frame, paste into new frame.
Back to step 1 until the spoke has been totally rotated.
RESULT
There it is! This contains 9 frames, which is quite enough i think.
Putting it in a game
If you're using something older than MMF2, use the OR ink effect. It may glitch around a bit, but there we go. Make sure the hotspot for all images is centralised.
If you're using MMF2, be sure to do the following:
1. Set ink effect to ADDITIVE (it's better than OR, whilst achieving a similar effect)
2. Make sure that every frame has at least a 1 pixel transparent gap around all its sides. Otherwise, MMF2's rotation system messes up.
3. Make the hotspot of all frames centralised.
4. Give your new object a behaviour like this:
Alterable Value A = 0


   - Set Angle to 'random(360)' with quality '1' (high quality)


   - Set Alterable Value A to '1'
That should make each copy of the object rotated a little differently, even if they're created at the same time (or close to it).
Thats a really good article. I did muzzleflashes on my game but I must say that I prefer pre-rotating objects if it's practical because lots of MMF2 rendered angles can cause slowdown. This is probably becuase my game is quite performance intensive and needs all the optimisation it can get though.
Also I tend to use flag 0 as the "starter" flag rather than an alterable value, because then you don't waste an alt value.
yeah, I find flags confusing cos you can't name them. The game I was using this in thankfully only had the 1 alterable value in the particle.
Nifty trick I've found for making particles shrink is to always decrease their scale by 0.02 (with quality set to 0). Then you check if the scale is 0 or lower and destroy the object.
It looks surprisingly nice, and there's no slowdown.
I guess scaling/rotating is fine, it probably only really has an effect for something like this if you have loads of other AI, graphics processing etc. clogging up the CPU as I do

 Advertisement


 Open MMF2


 It took me ages too
